
New Patient Registration
The first step in the clinic process is to register your new patient. To do so, click on “Registration” in the Menu Navigation Bar.

Pending Registrations
When the Registration page loads, any Pending Registrations that have previously been saved will show up on the Registrations screen. For more details on Pending Registrations and their functionality, click here.
New Registrations
To create a new registration, click the “New Registration” button on the Registrations window.

This will open the Registration screen, shown below.

Patient Type
MedSoft has two Patient Types: Medical and Non-Medical.
Medical patient type should be used for patient accounts that are being seen for a medical concern requiring physical therapy.
The Non-Medical patient type should be used for accounts being created for other services the clinic might offer, such as massage, gym usage, or other wellness activities.
Patient Types can be modified as needed in the Patient Center after registration is completed.
Referral Source
The Referral Source drop-down allows you to select a designation for how your patient was referred. This referral source drives many reports within the system and allows you greater insight into your patient generation. See our posts about the Referral Sources and Referrals by Type Report for more details.
If your patient was referred by a Doctor, you will want to fill out the “Referring/Treating Vendor” field directly below the Referral Source drop-down. This field is a find-as-you-type Search box. Please search by doctor’s last name, and then select the correct referring vendor from the drop-down. Doctors must have been entered on the Admin -> Vendors screen to populate in this search box.
Referral Sources can be modified as needed in the Patient Center after registration is completed.
New Patient
Check the “New Patient” box if the new account corresponds to a New Patient. If the new account is a clone of a previous account (for example: an additional account for a different body part, or an additional account to add a different Patient Type), leave this box unchecked.
Only patients with the “New Patient” box checked will be credited as New Patients on MedSoft reports.
Cash Patient
Check the “Cash Patient” box if the patient will be paying by cash. This will lift the restrictions on needing to enter certain information (like Insurance and Policy) prior to completing the registration.
The Cash Patient setting can be modified as needed in the Patient Center after registration is completed.
Dup Check
The “Dup Check” button will check the system for any existing potential duplicate patients. If you are unsure if the patient already has an existing MedSoft account, enter the first 3 letters of the patient’s last name, then click the “Dup Check” button. This will return a list of any potential duplicates within the system.
Therapist
This drop-down allows you to select a default Therapist for the patient. This will always be the Therapist selected by default when appointments are scheduled. The Therapist can be changed when an appointment is scheduled and/or checked in.
The Therapist can be modified as needed in the Patient Center after registration is completed.
DOI
MedSoft requires a Date of Injury (DOI) in order to complete a Registration for Medical Patients. A DOI is required for billing, so this requirement is one of the many ways that MedSoft works seamlessly with CAVU Billing to ensure your claims are processed successfully when they are sent the first time.
The Date of Injury can be modified as needed in the Patient Center after registration is completed.
Bypass Documentation
For Non-Medical patients, the “Bypass Documentation” feature is set as a default. This bypass allows any transactions for non-medical patients to skip over the therapist documentation process and go directly to billing.
The Bypass Documentation feature can be modified as needed in the Patient Center after registration is completed.
Appointment Reminder Method
The Appointment Reminder Method must be set for a patient to receive appointment reminders. The corresponding contact method selected for the reminder must also be completed. For example, if “email” is set as the reminder method, an email address must be entered.
Appointment Reminder Methods can be modified as needed in the Patient Center after registration is completed.
For additional details about MedSoft Appointment Reminders, click here.
Home Health
Patients enrolled in Medicare Home Health should have this box selected. When selected, the Home Health Patient Designation (shown below) will display on the patient’s account to alert all users.
Home Health Patient Designation Icon: 
The Home Health Designation can be modified as needed in the Patient Center after registration is completed.
Learn more about Patient Designations by clicking here.
Work Comp
If the patient is enrolled in a Medical Provider Network (MPN), please enter the name of the MPN in this field. This information will be displayed in the Patient Center, under the Financials -> MPN tab.
The MPN can be modified as needed in the Patient Center after registration is completed.
PTPN
If the patient has come to your clinic as part of the Physical Therapy Provider Network, please select this box. This designation will share to the Patient Center Detail screen. Additionally, the patient will show up on the PTPN Detail Report, which is provided for your use in PTPN reporting.
The PTPN Designation can be modified as needed in the Patient Center after registration is completed.
Special Instructions
Any notes entered in the Special Instructions box will share directly to Therapist Documentation. The notes in this box do not display elsewhere within the system; rather, these are a direct note from registration to the Therapist, and will appear on all exams as the therapist works on them.
Special Instructions notes will not appear on Completed Documentation PDFs or faxed copies of exams.
Insurance
The Insurance selection is a Find-As-You-Type search box. Begin typing the Insurance Provider name, and any matching results will pop up in a search result box below the text field. Click the appropriate insurance provider from the drop-down, then add an Effective Date. Click “Add” to add the Insurance to the grid.
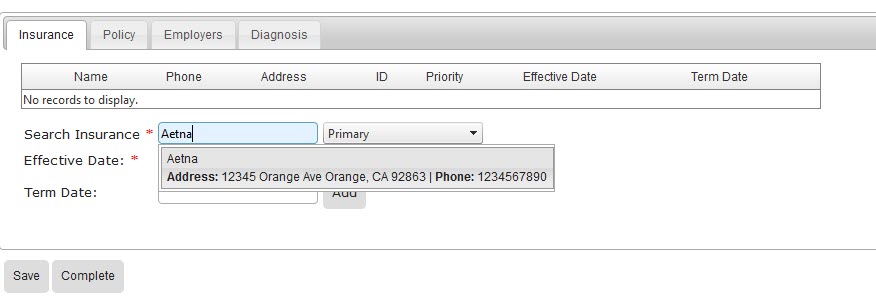
In order for an Insurance to display in the search results, it must first be entered on the Admin -> Insurances menu.
Insurance information can be modified as needed in the Patient Center after registration is completed.
Policy
A Policy can only be added after an Insurance has been added. Select the correct Insurance from the drop-down, then click “Add Policy.” The Add Policy window will open in a new window; fill in necessary information and then click “Add Policy” to add it to the Policy grid.
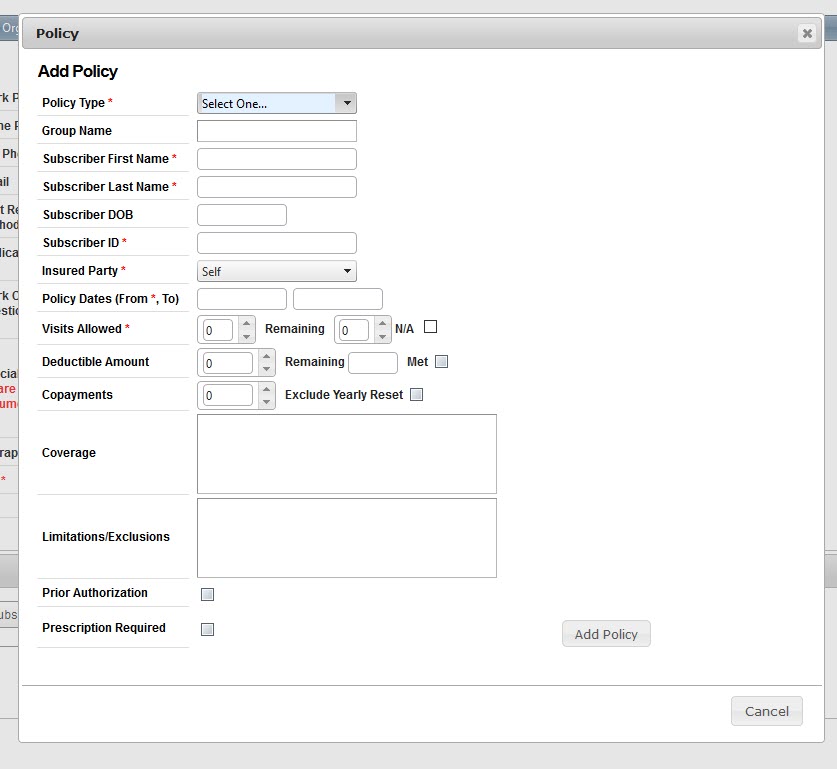
Items to note:
- The Policy type selected will be reflected in the color coding on the Appointment Calendar. See more details on color coding here.
- Medicare Policies will display two additional fields on the Policy window – Medicare Allowed Amount and Medicare Remaining Amount. The “Medicare Remaining Amount” will be displayed in red within the Patient Center. This amount will count down as patient visits are billed out, and users will be alerted to Medicare patients who are nearing therapy caps through the Medicare Used widget on the Insight Analytics page.
- Policy Dates are required to have a “From” date; the “To” date should only be filled in if a term date has been set on the policy. If a term date is set, patients who have one week or fewer remaining on their policy will be displayed on the Expiring Policies widget.
- Visits Allowed should list the total visits allowed per the policy guidelines. If some visits have already been used, please enter only the remaining amount in the “Remaining” field. MedSoft will count down the visits with each checked-in visit. Patients who are running out of policy visits will be displayed on the Expiring Policies widget. If the policy does not have a visit maximum (for example, visits are unlimited or determined by medical necessity), check the “N/A” box.
- Total deductible amount should be entered in the Deductible field. If the deductible has already been met, check the “Met” box. If some portion of the deductible has already been met, enter the remaining amount in the “Remaining” field. MedSoft will count down the deductible as billing occurs and the “Deductible Met” box will be automatically checked when that threshold is reached. This “Deductible Met” indicator will display for MedSoft users in the Patient Center and at the appointment check-in window.
- Enter the copayment amount in the “Copayments” field. This amount will display at the appointment check-in window.
- The “Exclude Yearly Reset” box should be checked for any policies that do not start/end on a calendar year. MedSoft automatically resets all patient policies on an annual basis (January 1 of each year). If the patient’s policy resets on a different cycle, please check this box. The policy will need to be reset manually by a clinic user.
- All Policy information entered, including Coverage notes and Limitations/Exclusions notes will print off on the COB form generated in the Patient Center for patients to sign.
Policy information can be modified as needed in the Patient Center after registration is completed.
Employers
Employer information is optional and can be filled out as relevant for patients. The Employer grid functions in the same manner as the Insurance grid. Search for the employer using the find-as-you-type feature, and select the appropriate result from the drop-down. Employers must be entered on the Admin -> Employers window before they will populate in the search results.
Employer information can be modified as needed in the Patient Center after registration is completed.
Diagnosis
If this patient’s diagnosis code is already known, that information can be entered at Registration. If the code is unknown, this information may be entered in the Patient Center and/or Therapist Documentation at a later date.
Diagnosis codes are searchable by “Description” or by “Code.” The search field is a find-as-you type field; results will generate below the text box and the appropriate code should be selected. Please note that ALL ICD10 codes show up in this search result. Codes that are displayed in red text are not eligible for billing; please select from the more detailed codes in black text.
Diagnosis information can be modified as needed in the Patient Center after registration is completed.
When all necessary information has been filled in, press “Complete” to finish the Registration process. The patient will now show up in the Patient Center in “Open” status.
If you’d like to Print Registration Documents when completing the registration (rather than at a later date), check the “Print Registration Documents” button before clicking “Complete.”
Clone Existing Patient
For more information about the Cloning feature, please click here.